Hello
Everyone...
Time for my
tree bark tutorial and sorry there is a lot of photos and steps..
This is what
I started out with..my supplies..

Layer strips
of masking tape onto canvas or whatever you want to make your tree on to form a
base for the scrunched up tape to stick to..

Now add
strips of tape and squish it up as you stick it down - not neat - just do it as
it comes...

and keep layering the strips until you think you have enough and you can make" knots" for the tree too..

and keep layering the strips until you think you have enough and you can make" knots" for the tree too..

I placed my
"Knot"in the centre and will add another later...

Once I'm
happy with the tape -'[ it keeps sticking
up a bit and wont stick down tight, but we are gonna fix that]..we come to
modge podge or any medium that dries hard..

While it is drying bits still pop up so just press them down while drying with a heat gun and they eventually stick down ....and when
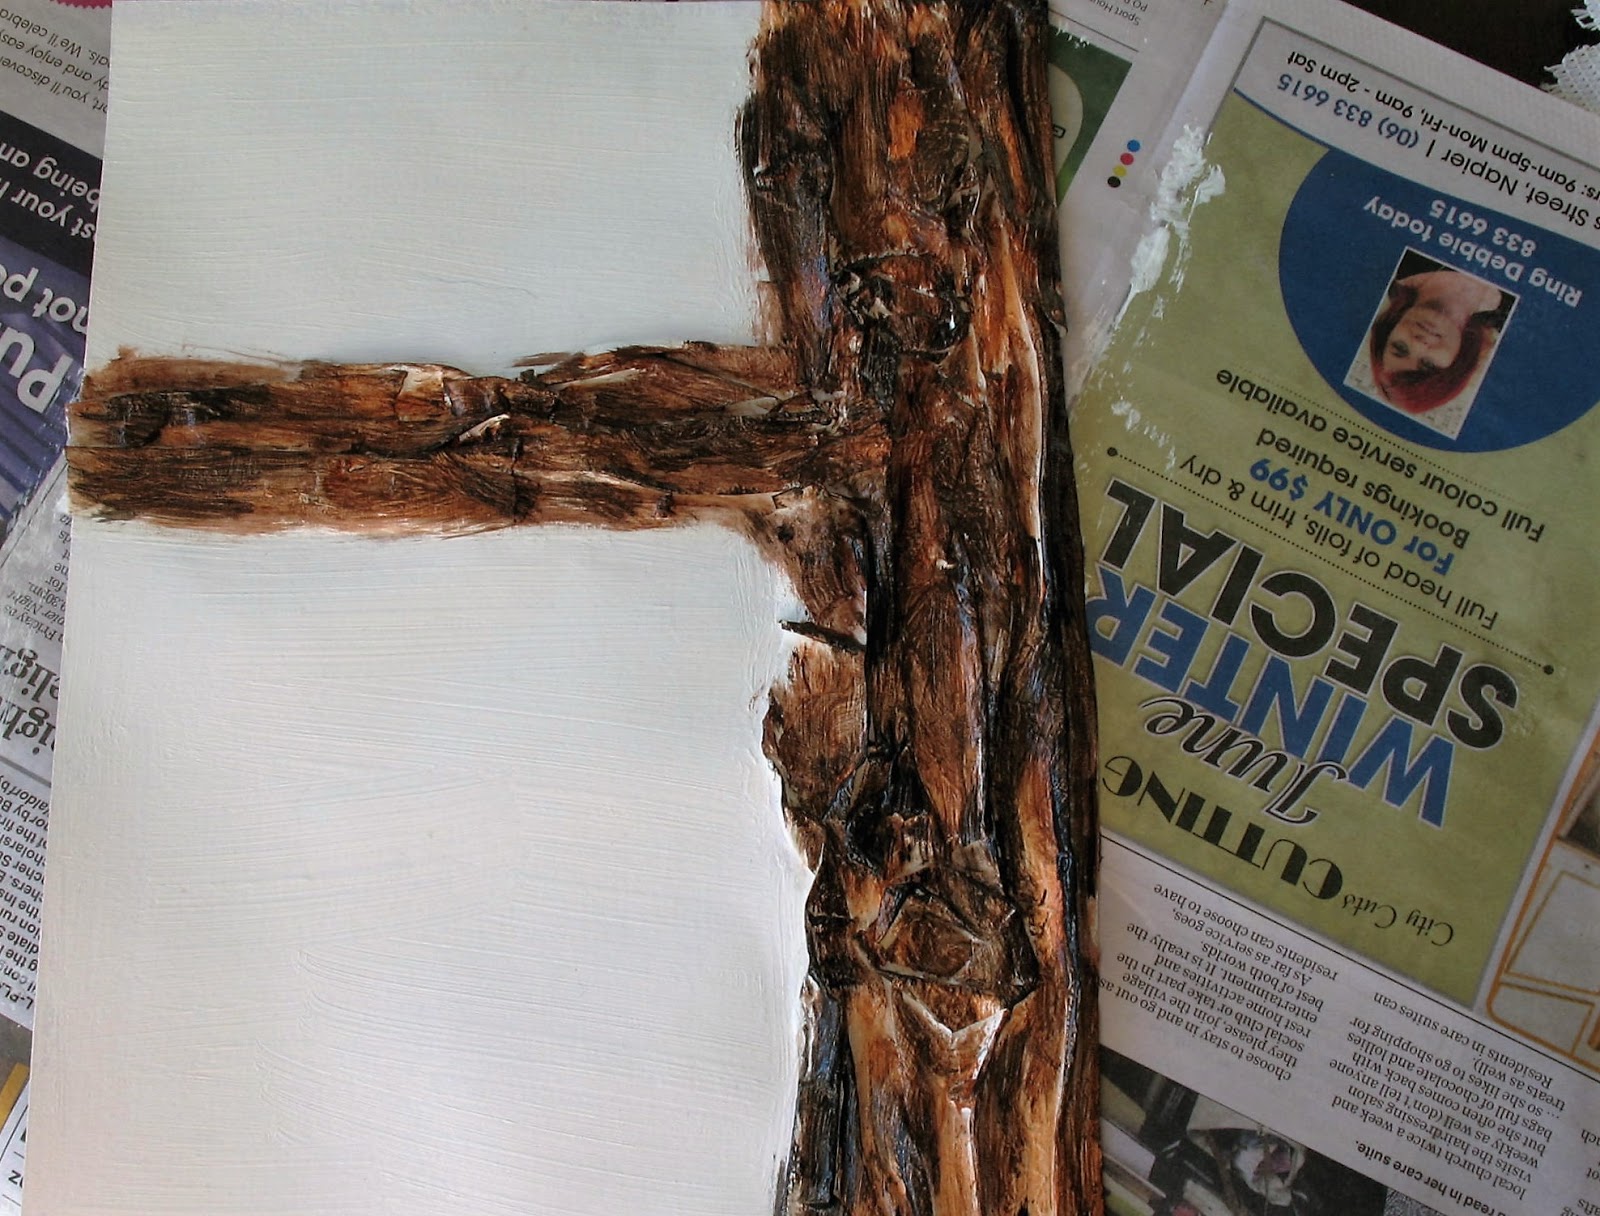
dry we cover
the whole tree and page with Gesso...this makes a non porous background for
whatever your colour medium is..

Now for the
fun part....PAINT.....
First layer
- Burnt Sienna or any light reddy brown colour..

Second Layer
- Burnt Umber or any darker reddy brown paint..

Third layer
- Raw Umber - or any shade of a darker brown.
Use the
brush really lightly and you get those strokes showing which gives it the
natural texture of bark..

Fourth Layer
- A light splattering of black..
All these
coats were added while paint still wet..you can wait for each layer to dry if
you want...I just don't have a lot of patience..and I really think it works
better while the layers are still wet.
NOW..I let
it dry - be back after lunch..

Two
ham,cheese and onion sandwhiches later..I'm back..
Have coloured
the background with Geltos and used baby wipes to help wet and spread.. then
used my fingers on the rest....

Back to the
tree...this time a bit of shading with a black pastel crayon and add any more
black and brown paint to the trunk and branch just in case it needs it...as it
dries it sometimes leaves too much white showing..

Punch out a
gazillion leaves and stick them down..only on the stalk ends so they pop out..

Then I added
my "Sweet Blooms" image from Miss Daisy Stamps


Little cutie has even made diamonds grow in the centre of her flowers...
Now that was supposed to be the end of my tutorial...but
the more I looked at this project over the last fews days.. the more it rattled
me and I was not happy that I place the branch so low down the page and made it
so thick...So I added another branch and leaves...and a Marianne watering can and wheelbarrow die...

Some leaves
in the join of the branch and then added a birdhouse tied on the branch with
string..now I'm happier...

Thanks so much for stopping by and hope my tutorial showed you just how easy it really is..I love doing these trees and I feel a forest coming on in the near future..with a Deer..and snow..you just never know..
See you tomorrow..
luv CHRISSYxx
25 comments:
Wow Chrissy what an amazing tutorial. That tree is just stunning. Love the scene you have created around it with the the girl. Thanks so much for sharing your wonderful talents with us. Oh by the way those sandwiches sounds yummy.
Hugs Desíre {Doing Life}
Absolutely amazing. Thank you for the tutorial. It's a grand technique!
Fabulous tutorial and I am one for sure to try this once my mojo returns. Great step by step instructions and looks awesome...hugs.x
Wow words fail me, this is fabulous, so clever. The added extras really finish it off. Well done. Hope you will enter my giveaway x
Wow Chrissy thank you so much for sharing this with us, its brilliant
Kevin xx
Chrissy this is fabulous. I love painting trees but this gives much more texture and makes it come alive. Brilliant!!!! Thank you for taking the time to share it with us. Hope you enjoyed your sandwich too!! Big hugs, Carol S.xxxx
Thanks for the tutorial Chrissy, I'm really going to have to try this...looks fun and the finished result is so realistic!
Fab card too!
Chris
x
Excellent tutorial with fantastic and interesting results! Have a great day xx
Fabulous and beautiful work, Chrissy. Thank you very much for showing us the step-by-steps for your amazing tree. This is a superb tutorial. You are an inspiration. Happy Stamping! Love, Miss Daisy
Thank you, Chrissy! What a fun tutorial!
Oh great tutorial my friend I remember doing a canvas with a tree and I remember getting my trunk too big ha ha still is. But really love yours and the wonderful scene you have created around the tree xxxxxxxx
Aaaaaah....so thats how it's done! An incredible tutorial and finished project Chrissy xx
Totally awesome Chrissy!!! Thanks so much for sharing. Hugs
Oooh what an amazing tutorial Chrissy...have always drooled at your tree trunk and you are so super generous in sharing the technique
Thank you so much !!
Cheers
Dr Sonia
Beautiful card Chrissy and what a fantastic tutorial, wow, awesome work
hugs
lorraine x
Wow, such a brilliant tutorial, Chrissy...great step-by-steps! And the end result is awesome!
xxx Margreet
Good morning sweetie, what a gorgeous creation from you today :0) hugs Pops x
Fabulous tutorial Chrissy. I love how your bark turned out, so realistic looking! Thanks for the tips and tricks. hugs :)
Oh wow Crissy, this is totally amazing and I love your tutorial on how you've done this idea!! You clever girl!! :) I adore your projects and I never wouldn't have guessed this is how you do it! Thanks for sharing! HUGS
Love how you make your trees and great step by step
Carol x
Absolutely fabulous Chrissy! Thanks for sharing your tutorial, so clever.
Hugs
Wendy xx
Wow! it's wonderful to see how you achieve the tree bark Chrissy… it looks SO real… love the finished canvas… so sweet with the little birdhouse and wheelbarrow! :-) I can't wait to see one with snow on now!!
Hope you're having a good week!
Big hugs Sue B xx
Super tutorial Chrissy, thx for sharing. I just love your tree looks amazing.
And before you add the small downwards little branch and the dot of greenery where that brach sit your tree has a face. At the end he still has a face but it is less clear to see, so fun. Hugs, Veerle xx
Fabulous tutorial, loving your tree, thanks for sharing it. Barb
Stunning Chrissy. Such a cool card and wonderful tutorial! Thanks for showing us your process, it's awesome. Hugs, Wends xoxo
Post a Comment